Let automatics work for you By John S. Ball III


Manual adjustments can scar your mat

Manually working to achieve mat quality with a paver screed is a lot like trying to iron out all the wrinkles in our favorite shirt: If we apply pressure with a cold screed, we have no affect on the "wrinkles" in the mat. If we press with too hot a screed, either we can't move the screed, or we "burn" the mat. The texture of the mat is related to the pressure of the screed, so it makes the most sense to let the automatics on the machine work out the wrinkles for us.

It is important to understand automatics and use them as much as possible so these factors can be controlled by the machine and not left up to the possibility of human error. Although this does not cover every little nook and cranny, here are a few tips to help achieve mat quality.

Let's assume we've been delivered a nice, homogeneous mix, and we're observing it in the hopper. It's up to us as a paving team to move the material as a mass. The less interruption to that movement, the less segregation we cause. We know to avoid interruption we have to receive the mix as a mass in the hopper and hold the hopper nice and full. Veteran team members also know the flow gates have to be adjusted properly so when the mix is drawn back by the conveyors, we end up with an even texture of materials coming back and dropping off into the auger chamber. That's how we get the right head of material, assuming the paver is running at a continuous, consistent speed.

In the auger chamber, if the flowgates are not adjusted properly, and the height is off, mat quality is off. Mat quality is off because the head of material is interrupted. You may be starving or overfeeding the screed. The material should be half way up the height of the auger (see Figure 1, this page). Too high a level of material builds up too much, and forces the screed to ride over it. Too low a level of material starves the head of material.

In the screed, the angle of attack is higher than the back end of the screed. The pressure on the screed will give either a good or bad mat texture - the screed tends not to compact evenly and will have a shorter life, while the material won't stand up to traffic and will tend to rut.

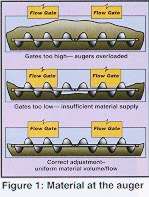
We want to get the material to the back of the screed evenly and without segregation, and we want to move it as a mass.

Feeder control sensors are key to the process
In the auger chamber, we have to make sure we have the right guards, auger extensions and feeder control sensors. We have to keep in mind whether the feeder control sensors have a start and stop configuration, slow, medium or high speed settings, or whether they are contact or noncontact type, to properly control the speed of the augers and height of material. Sensors can move left or right, up or down. We should run augers continuously. Auger speed should be adjusted so a continuous slow flow of material occurs. As the mix travels to the end gate or edger plate, it comes in contact with the sensors.


Normally, at the start of the workday, we let the automatic controls bring the mix out as far as it will go, and if we didn't have the right height, we would manually shovel mix in the corners of the paver. As the sensor comes in contact with the hot mix, as the material is pushed out from the auger, the sensor stops the auger from turning. To keep material moving as a mass, we often override the sensor and bring more material out manually.

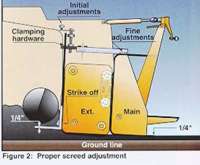
We must stop bypassing the sensors because they affect the pressure on the screed. As we interrupt the flow of material, mat texture is affected. We wind up with too much material, the screed tries to ride over it, and we have a harder time achieving uniform pressure across the screed.

A properly adjusted screed helps the cause
If the screed is not properly adjusted, mat texture will look bad (see Figure 2). And just bending down to have a look won't do. You have to get down on your hands and knees to get up close and personal with the screed. Run a straightedge transversely
from 9 o'clock to 3 o'clock - across the length of the screed to check the crown for proper adjustment. Since most screeds are 10 feet (3 meters) long, the straightedge should be 10 to 12 feet (3 to 4 meters) long so you can see the big picture. You should check to see if the screed is warped, worn, pocked with holes or gouges, or out of alignment.

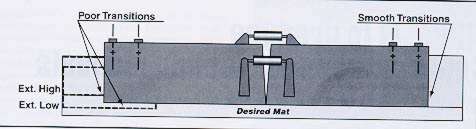
You also want to run a straightedge from front to back of the screed to check misalignment of the extension, the pre-strikeoff if your paver has one, and the permanent pre-strikeoff. You are making sure all the screed parts are adjusted properly (see above).

Even if your screed is properly adjusted to begin with, you can also make adjustments as you pave to achieve mat quality. For instance, as the hot mix moves to the back of the paver and drops off into the auger chamber, if the material stays stagnant as the augers turn, you may need to adjust the position of the screed.

Maybe the screed is too far back from the auger. In that case, you can move it ahead and check your screed side arms so the screed tracks straight behind the tractor. The screed should now be close enough to the augers so as the material is being sheared off, it moves all the time and is constantly replenished through remixing.

Other adjustments can improve mat quality
There are several other things you can do to achieve mat quality without having to bypass the automatic controls on your paver. As the material is drawn back to the auger chamber observe the edger plates. If the material has not reached the edger plates uniformly, you could have segregation at the edger plate from not having enough material there. To prevent this, you want your auger tunnel guards and auger extensions in place to control the height and flow of material across the screed. If interrupted, the material will "run."

Another possible trouble area is at the auger bearing holder. If the auger or bearings are worn, you could wind up with what is called auger shadows on the mat. The tow point cylinder at the side arm should also be properly adjusted.

Vibration of the screed is another factor. Amplitude and frequency are key, just as they are in compaction operations. Frequency relates to how fast the screed moves and amplitude how high it moves up and down Vibration helps activate the material under the screed, and after head of material this is very important depending on the mix you are laying. Tender mixes are not as strong and may not need as much vibration as harder mixes.

The goal is to build an even head of material all across the screed so mat pressure is uniform. Otherwise, the result could be a streak, shadow or segregation, and when you're in the production mode, nobody wants to hold up the flow of work because at this point money is the factor. With automatics, the pressure on the screed will not be as severe as it would be in the manual mode Newer team members don't always understand the fundamentals because they haven't gotten down on their hands and knees to check the adjustment of the screed. This process should be a part of every training program. And, contractors should remember paver manufacturers can help with some of the quality and training in how the screed operates.

Just as in ironing the shirt, personal effort plays an important part in mat quality. The more effort and attention paid to the equipment, the better mat quality we will achieve.

Home | Articles | Qualification | Calculators

Top Quality Paving

PO Box 4398
Manchester, New Hampshire 03108
Cell Phone 603-493-1458

Write to us at our E-mail address for more information

tqpaving@yahoo.com

Visit Asphalt Contractor Magazine Online!

WebMaster: Sullivan+Wolf Design, LLC